
Step Two of Revising You First Draft: Outline Your Story
This post has been a long time coming, but at long last, here you go: step TWO of revising a first draft.

(Disclaimer: You do you, friend! This is the method I used/am using to revise my current WIP, but that doesn’t mean it’s the only way or even the “right” way! Take what is helpful and leave the rest--but above all, trust your writing gut. You know what your story needs better than anyone else!)
So after you’ve completed the exercises listed in this post, it’s time to track narrative drive and your protagonist's internal journey. The best tool I’ve found for this is Jennie Nash’s two-tier outline. (To get your own copy, click here. To check out the Creative Live class that Jennie teaches, click here. To watch a free webinar about it with Jennie and one of her writers, click here.)
The two-tier outline is simple on the surface: You outline each scene at a plot level and at an internal character development level (two-tiers--get it?).
But once you start using it you realize it’s actually fairly complex, because you are tracking the connection between the scenes and the connection between the events of one scene and how they matter to the protagonist. It’s not just a list of what happens, it’s why it happens, and what happens because of that.
So here’s what it looks like:
Hilst Two Tier Outline Take One
This is me tweaking the scenes in my first draft BEFORE I’ve revised anything. I’m just playing with it, trying to put the pieces together before I sit down and start revising the actual draft.
A few things to note:
The scene descriptions are short--they are almost like the “alpha point” of the scene if you use the Story Genius scene card method. They focus only on the most important plot point of that specific scene.
The points focus on the internal plot--it reveals why this scene matters to the protagonist and their inner journey. It also includes: new insights, realizations, and new goals that the protagonist makes.
Now, Jennie usually teaches that the first time you do your two-tier outline you should keep it to only two pages and should only include scenes that are the most important. This makes sense, but since I’m using this for a revision (and because I was still feeling my way in the dark a lot) I did as many pages as I needed to outline the entire novel (which wound up being five pages, I think).
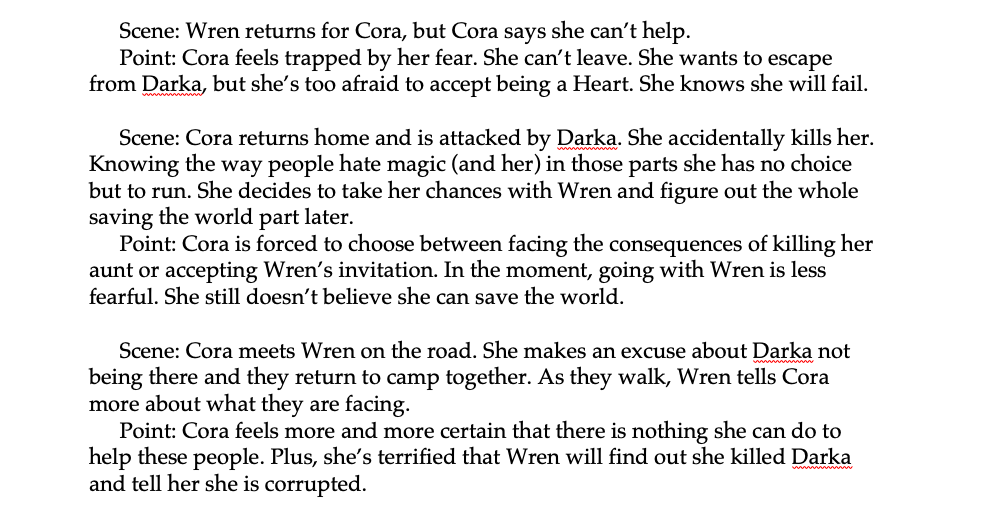
After working on the two-tier outline for a loooong time (I think it took four weeks), I finally landed on my third version, which looks like this:

Hilst Two Tier Outline Take Three
A few things to note:
I used the terms “Because of that” at the beginning of each new scene as a reminder that it needs to build off of what came before--but the tricky part is, it doesn’t build off of the PLOT that came before, it builds off the POINT that came before (or it should...I still mess that up sometimes!).
This version is VERY different from the earlier version. Can you imagine if I’d gone through this and actually drafted each of these outline versions?! That would have been such a waste of time. Instead I sat down and worked on it from a higher level--a big picture approach which saved me time and wasted revisions.
So, how do you use the two-tier outline for your revision?
Step 1: Start by watching this video that gives an overview of the outline.
Step 2: Create a simple Word document with scene/point couplets prelabeled for a few pages.
Step 3: If you already know there is a lot you want to change, just start your outline from scratch. If you think your story is hanging together pretty well as it is, go ahead and draft out the exact scene/point of the draft as it is currently.
Step 4: Revise your outline. Look for connection between scenes, the development of the internal journey, the places where the connection between scenes breaks down or where it’s hard to articulate a point for a scene (or a scene for a point).
Step 5: Let it rest. No really, let it rests for a few days.
Step 6: Revise again.
Step 7: When you are fairly certain it’s ready, ask a writer friend to give you feedback on it.
Step 8: Revise again.
Step 9: Use it start drafting. (More on that in the next post!)
Overall, starting your revision with the two-tier outline will save you time and give you a place to start that makes sense--it will also keep you from falling into the trap that many writers fall into which is the assumption that revision happens on the pages of your draft.
It doesn’t. (Not until much later in the process.) No, revision happens in your head, where you analyze your story, pull it apart, fit it back together, add, subtract.
And just for fun, I want to give you a little update on my own revision:
I’m currently twelve scenes in to drafting my revision. (Side note: My first scene changed a fourth time and is not about Cora altering food using magic, it’s about Cora using magic to help her chickens lay eggs so they have food to eat. That happened when I went to plot my “scene” from the outline onto a scene card and realized there was zero material there...it happens.)
Twelve scenes in, I hit a snag and realized that much of my plot wasn’t fitting together right. I found I kept adding scenes that weren’t on the outline and that they were taking me in a different direction from the outline--and that the new direction was better.
Basically, I am throwing out my two-tier outline and starting over again (I know!) But it’s such a good thing. Trust me. My character’s internal struggle wasn’t working. I forced it to work on the outline (#don’tdothis) but when I sat down to write, luckily, the right one came out instead. Now my story needs to change. (Again. Again again again.)
And all of this happened because I let myself revise the STORY not the words.
And that’s where the real revision magic happens.
(Missed the first couple of posts in this series? Check out How to Revise Your First Draft: Three Exercises to Get You Started and How to Set Yourself Up for a Successful Revision.)